In this cell shading tutorial I cover a method of doing cell shading in 3DS MAX with the scanline renderer. Of course cell shading can be done by using Mental Ray's Ink'n Paint material but in this tutorial I concentrate on a method that is very fast and works with both scanline renderer and Mental Ray.
Default Rendering in 3DS MAX

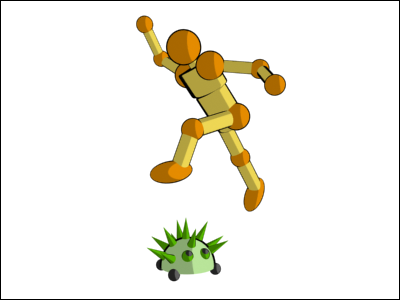
Picture 2. A rendering in 3DS MAX with the default settings of the scanline renderer. The picture is illuminated by one Omni light.
In picture 2 you see a standard rendering in 3D Studio MAX. All material settings have default values except for the diffuse value which has been adjusted to get some color. The model is illuminated with one Omni light. So if you are trying cell shading according to this tutorial, please do the following preparations:
- Open a simple 3D model.
- Apply materials (adjust only the diffuse color).
- Create one Omni light with default settings.
- Change background color to pure white
Remove shading

Picture 3. Self-Illumination is changed to 100. As a result there is a rendering with no shading. In other words there are no darkness variations in any single color.
The first thing to do is to get rid of the shading. At the moment the model is clearly shaded. There is a lot of color variation that depicts the levels of darkness. Shading can be removed from material by changing Self-Illumination to 100 (Blinn Basic Parameters > Self Illumination: 100). The result is shown in Picture 3. (If you are familiar with 3DS MAX you might wonder why we even created the Omni light. At the moment the light has no effect at all but in the end it will have.)
Add Composite Map

Picture 4. Composite map is the basis for cell shaded material.
We will be using two separate maps to achieve cartoon rendering:
- Falloff Map for the cell shading
- Mask Map for the black edges
We will use Composite map to combine these two maps into one material. So first add Composite as Diffuse Color Map according to picture 4.
Add Cell Shading

Picture 5. Falloff map is used to achieve toon shading in 3DS MAX.

Picture 6. The upper color is the color on the shadow side and the lower color is the color on the side of the light source.

Picture 7. Cell shading is easily achieved by adjusting the Mix curve.

Picture 8. Cartoon rendering in 3DS MAX.
The actual cell shading is achieved by using Falloff map. Click on Composite map and add Falloff as Map 1 according to picture 5. Click on Falloff map and make the following adjustments to it:
- Select colors for your model (picture 6). The upper color is the color on the shadow side and the lower color is the color on the side of the light source. So the both colors should have the same hue but upper color should be darker.
- Change the Falloff Type to Shadow / Light (picture 6)
- Adjust the Mix Curve according to picture 7. Add two new control points to the curve and place them according to the picture. (The staircase falloff curve combined with the Self Illumination is the key to cell shaded graphics.)
Now is a good time to make a test rendering with the cartoon shader. At the moment the cell shading should look like in picture 8.
Cell Shading with Borders
Add Mask

Picture 9. Add Mask to Map 2 in the Composite map.

Picture 10. Noise map is used just to produce a black color.

Picture 11. Noise map's output is just black color.

Picture 12. Black borders for the cartoon shading are achieved by combining black color (Noise) with a mask (Falloff).

Picture 13. Staircase Mix curve controls the thickness of the black edges.
Let's add black edges to our cell shader. Go back to the Composite Map and add Mask as Map 2 according to picture 9. (In rendering the Map 2 is displayed on top of Map 1. The purpose of Map 2 is only to produce back edges. Mask is needed because we want to show Map 2 only partly (edges)).
Add Noise Map
Next click on Mask. There are two slots: One for Map and one for Mask. First we need to place black color to the Map slot. Let's do that with a Noise map. Choose Noise as Map according to picture 10.
Click on Noise and change the white color to black according to picture 11. This way the output of this Noise map is just black color. (We could have achieved the same output also with several other maps)
Add Falloff Map
Go back to Mask and add Falloff as Mask according to picture 12. We'll use Falloff map to mask unwanted parts away.
Click on Falloff and adjust the Mix Curve according to picture 13. Add two new control points and place them according to the picture. (The placement of the stair controls the thickness of the black edges.)
Cell Shaded Rendering
Picture 14. Cell shading with Super Sampling.
Render to test your cartoon shader. The rendering style should look similar to picture 14. If you render a large picture you will see many jagged edges. To fix this just turn Super Sampling on. If you have several materials you might want do that globally in Renderer's settings. Picture 14 is rendered with Super Sampling. (The effect of Super Sampling is hardly visible in such a small rendering but in large renderings the effect is clearly visible).
Cell Shading With Three Colors
Usually two color shades is suitable for cell shading but sometimes you might want more. If you need more color shades just add one or more steps to the Falloff Map's Mix Curve. Just make sure you adjust the right Falloff map. It's the one with color.

0 commentaires:
Enregistrer un commentaire